Achieving equilateral triangles
Below is a diagrammatic representation of Harry Boyd’s principles for achieving equilateral triangles on 6 strip rods and to help visualise the geometric shape of an irregular triangular strip.
Here is a .pdf
Essentially the method is:
You take the three measurements in sequence (1,2,3) rotating the strips in your micrometer clockwise starting with the enamel side. From this you establish which is the largest , second largest and smallest dimension.
This gives you a sequence (eg. 1,3,2 or 3,1,2 etc.)
You then place the strip in the form and cant the plane relative to the enamel side as shown.

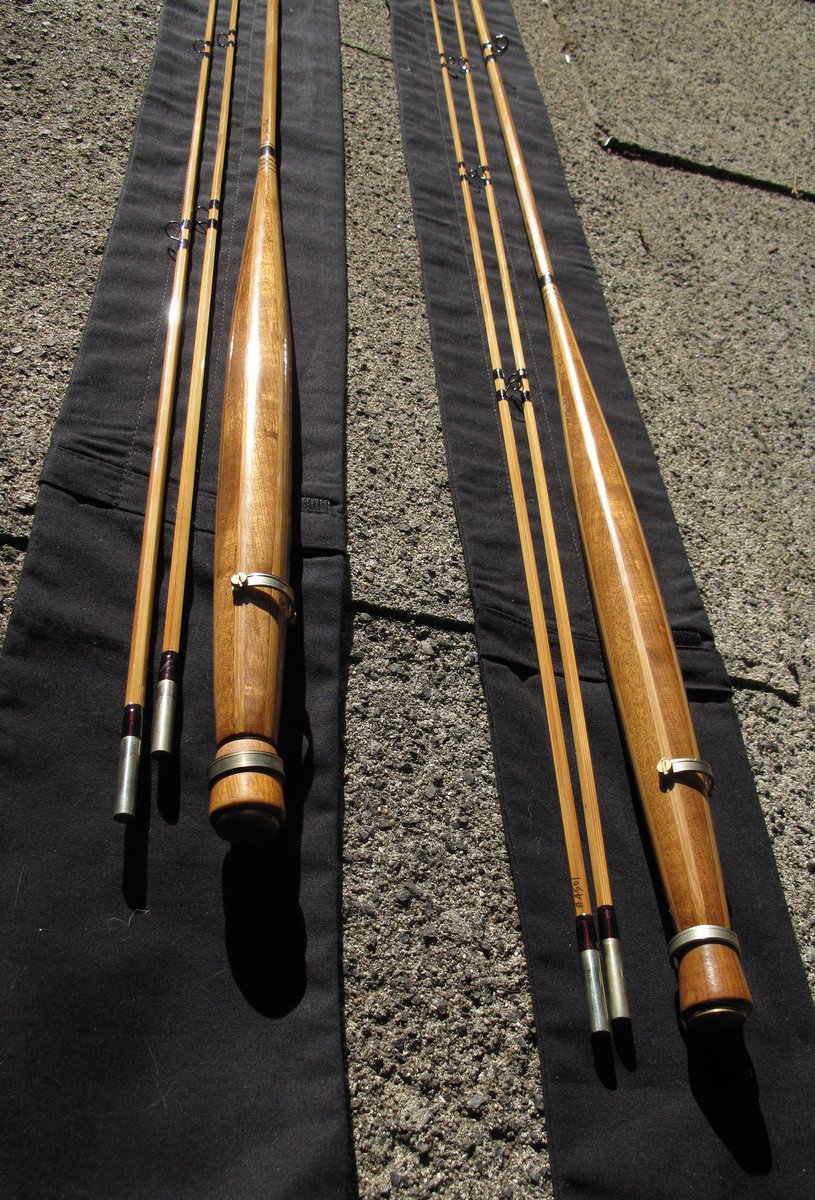
A brace of mortise grip rods
Just finished this matching pair of mortise grip 7ft6 4wt’s. (Still need to iron the rodbags :))


some other recent rods

Claret wraps

8ft6 6wt with fighting butt

7ft6 3wt

7ft6 2/3 wt

5ft 3wt 3 piece pack rod made for myself

The 'wisp'. 7ft 000wt bamboo rod
Recent rods – Nov 2011
 7’6″ 2wt and 7′ 3wt – panga panga and bamboo reelseats

7'6" 2wt and 7' 3wt


another view

green wraps and what I call 'busy bee' wraps to match reelseat

from above


Laminated bamboo reelseat with first attempt at engraving on butt cap
some useful rodmaking lathe gadgets
-

- Dedicated live centre – front view. Aluminium bar bored to fit a bearing. The very end of the rod section is first turned to match the bearing ID. The rod can then be fitted into the bearing which acts as live centre whilst turning the rod/grip

-

- Dedicated live centre – rear view. Aluminium bar is turned so that it can fit a tailstock chuck or straight into the tailstock with a morse tapered section

-

- Cork centre-front view – This piece is to hold a cork butt cap. It fits into the dedicated live centre above (and as below)

-

- Dedicated live centre plus cork centre – the piece on the right is the dedicated live centre. The piece on the left is the cork centre. It holds a cork butt and fits into the dedicated live centre

-

- Insert turning parts-The top piece goes into the headstock chuck up to the shoulder. The other piece takes a live centre. The insert (drilled with 8mm hole) goes over the 8mm threaded rod

-

- Insert mortise turning parts. One piece goes into the headstock chuck up to the shoulder. The other piece takes a live centre. The insert (drilled with 8mm hole and turned to size) goes over the offset 8mm threaded rod.

-

- Expanding mandrel – for holding a butt cap or slide band for facing/polishing etc. Aluminum bar drilled right through, then tapped most of the way through from rear, then slit most of the way from the front. The tip of the bolt is tapered down. The cap/ring is fitted, the bolt tightened until the cap/ring is held firm, then the piece is mounted in the headstock chuck

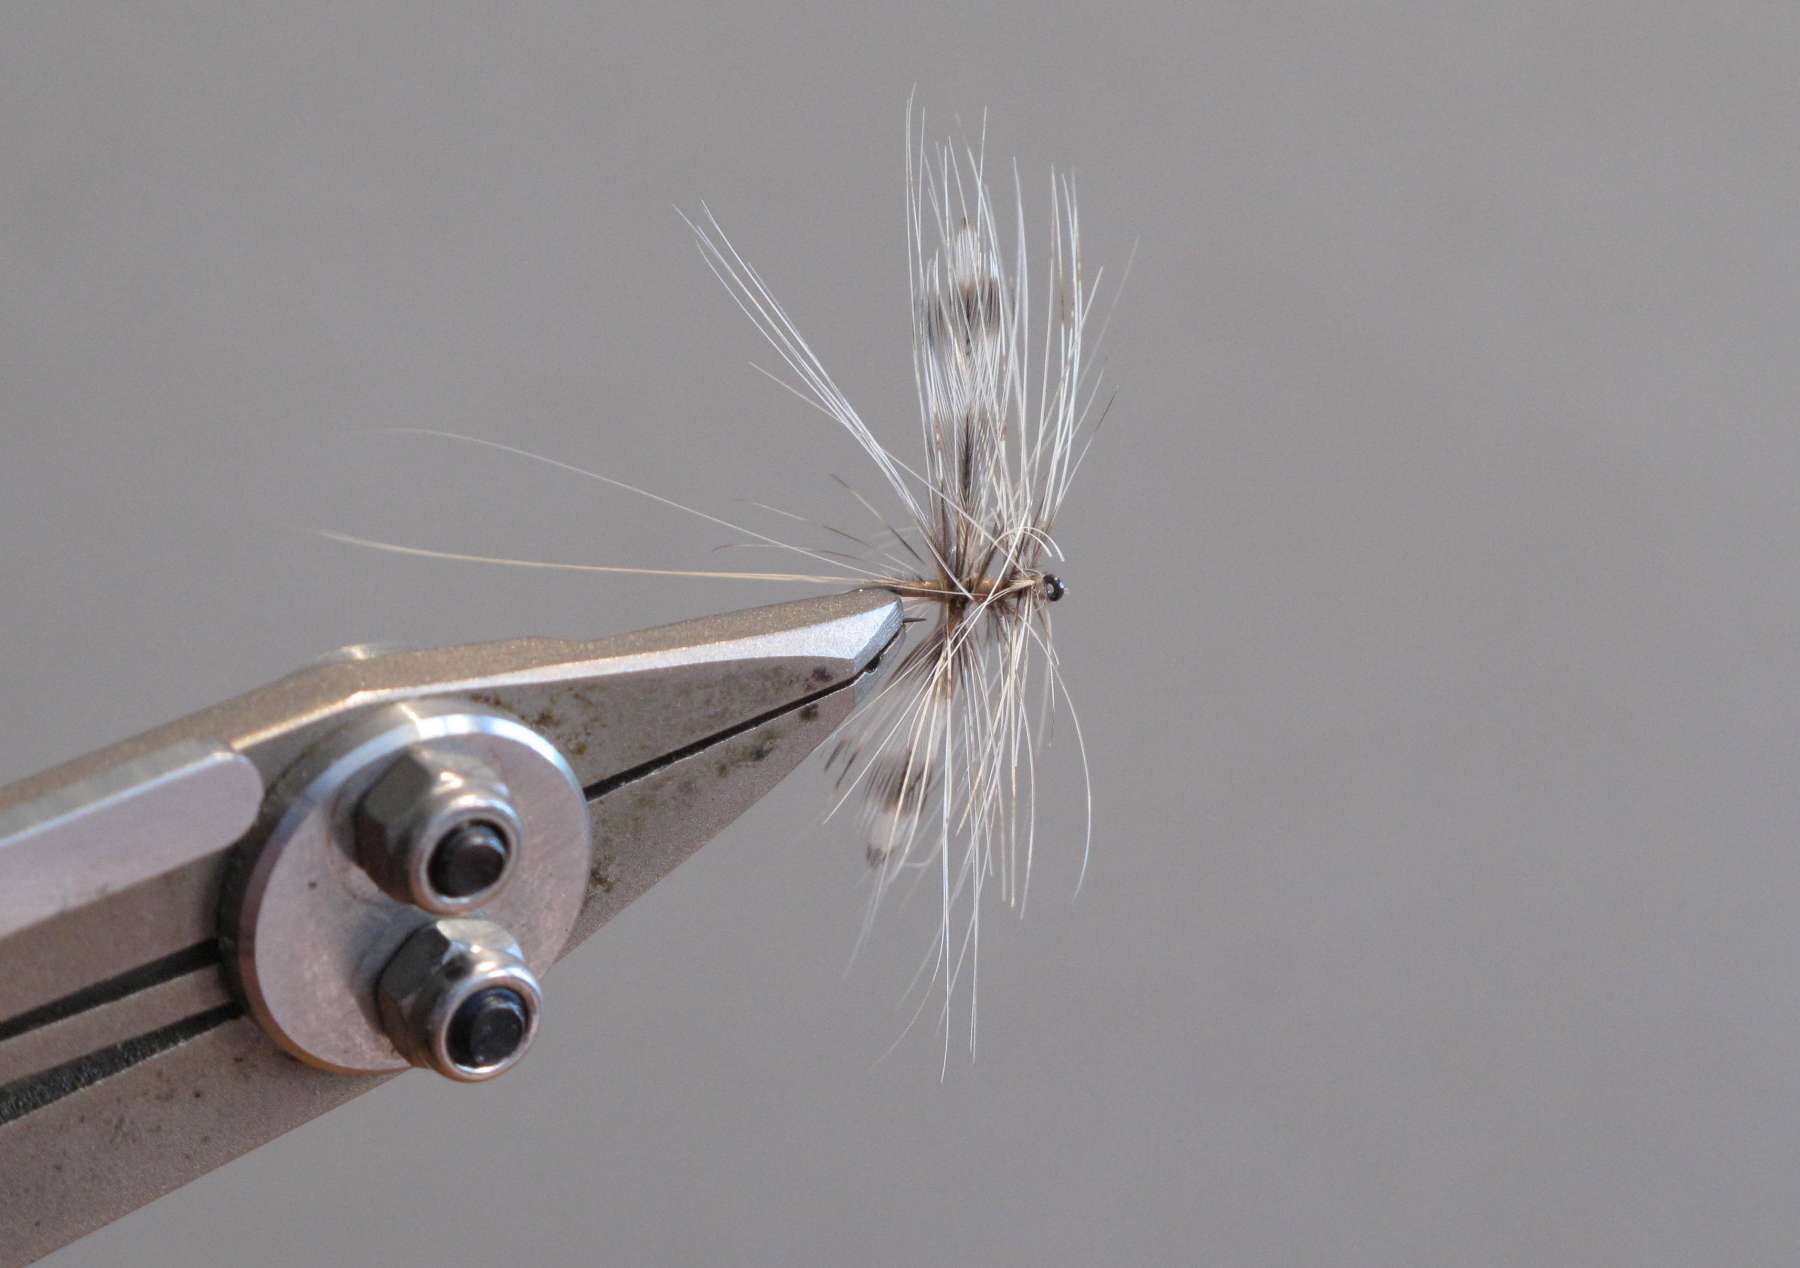
Libellulidae dragonfly nymph fly pattern 1
Libellulidae dragonfly nymphs are frequently found in stillwaters. These nymphs differ from the Aeshnidae nymphs in that they are wide and flat rather than cylindrical in cross section. They tend to be sandy/tan coloured nymphs with lighter bellies and darker backs.They are often a lot smaller than the Aeshnidae.
Materials
Size 10 -14 nymph hook (The hook used here is a Grip 11801BL #10)
Thread – tan 8/0
Tail – brown goose biots or marabou
Body – Chenille set with UV Knotsense covered in tan/sandy/yellow SLF (or similar) dubbing
Ribbing – copper wire
Legs – tan/brown soft hackle (partridge/pheasant etc.)
Eyes – burn nylon
Head – dubbing as per body

Libellulidae dragonfly nymph showing typical wide flat body and sandy colouring

Completed fly top view showing wide body. (The ribbing could be more evenly spaced but this does not worry me too much. I tend to tie many of my flies in a casual ‘rough and ready’ way as I think they end up being more ‘buggy’)

Completed fly side view showing slim profile and clear hook gape
Completed fly bottom view showing wide body.

Step 1 – Lay a thread (tan coloured thread) body and tie in 2 goose biots (or brown marabou) for tail and a strand of copper wire

Step 2 -Burn nylon eyes and tie in 2 or 3mm back from eye of hook

Step 2- Nylon eyes top view. Tie in eyes with figure of eight turns
Step 3 -Tie in a strand of thin chenille behind the eyes, loop around rear of fly and return. This forms the wide flat body for the fly. The colour of the chenille is not critical because it will be covered with dubbing in this version of the fly.

Step 3 -Chenille tied in – side view. Fly profile kept slim
Step 4- Squeeze a bead of Loon UV Knotsense onto the chenille. (You could use a fast setting epoxy if you are willing to wait a few minutes whilst it cures)
Step 5 – Set the UV Knotsense with UV light – this is an inexpensive UV keyring light. Repeat the UV Knotsense application on the underside of the fly to bond the chenille to the hook
Step 6 – Spin a dubbing noodle of tan/yellow/sandy coloured dubbing
Step 7- wrap dubbing over chenille to behind the eyes

Step 7- top view
Step 8 – Gently wind copper in even turns to behind the eyes being careful not to compress the sides of the body. Use the wire to form a waist behind the eyes

Step 8 -top view showing a ‘waist’ formed behind the eyes
Step 9 – strip and trim a soft hackle feather for the legs as shown

Step 9 – Tie in the tip of the feather to the underside of the hook at the waist behind the eyes
Step 10- Fold the soft hackle feather forward and tie in, in front of the eyes (You can simply wind a turn or two of hackle instead and massage the fibres into place when forming the head – you ideally want them on the sides and pointing slightly down)
Step 11- Spin another dubbing noodle and form the head with figure of 8 turns over eyes
Step 12 – Form thread head and whip finish. Varnish thread.
Step 13 – Dab top with brown coloured marker and you are done.

Recent 7’6″ 2/3wt bamboo rod


Upper Olifants Dec 2010
Another trip up to the Upper Olifants.


RAB Flies tied by Tony Biggs
These are flies tied by Tony Biggs. The story of the name ‘RAB’ is something like as follows: Tony and 2 friends were fishing on local stream together. The fishing was slow and at lunch they decided to split up and fish on their own for a while. After sometime they regrouped. Tony had caught his bag of sizeable fish – these were days prior to catch and release – and the other 2 hadn’t caught a thing. One of the guys asked Tony what fly he caught them on and Tony showed them a fly like one of the flies shown here. It was tied with red Pearsall’s Gossamer silk and had a pronounced red spot at the tail. Tony’s friend promptly dubbed it a ‘Red-Assed Bastard’. And so the RAB was born. The then president of the Cape Piscatorial Society, AC Harrison, in the interests of decorum decided it could also be known as the ‘Rough and Buoyant’. These are great flies to fish on days with a light breeze. Fish will move far too intercept them.
Interestingly Tony doesn’t use a bobbin to tie. He simply snaps off a length of thread sufficient for the fly and then hangs a pair of hackle pliers onto the end of it. After hand whip-finishing he then simply snaps the remaining tag off. Scissors are used sparingly.


Fishing rod spines, splines and guides
Rod sections are not always equally stiff in all directions. They sometimes have what is called a ‘spine‘ or ‘spline‘. There is an ongoing debate amongst rodmakers, and some confusion, about where guides should be placed relative to this spine or spline and where in fact the spline or spine is located.
For the most part this is pretty much a debate of little consequence but in certain instances, where a rod has a pronounced spine, getting the guides in the wrong orientation can make the rod twist in your hand when fighting a fish or casting a long line. Clearly it is important therefore to consider where to place the guides in these instances.
I am of the school of thought that the guides should NOT be placed on the spine or at 180 degrees to it but rather at 90 degrees to it. I am often told this is ‘counter intuitive’ but to me it makes sense. This is my reasoning:
If you used an ordinary measuring ruler as a fishing rod, on which side of the ruler would you mount the guides – on one of the wide sides or on one of the narrow sides? Answer – surely one of the wide sides. Why? Because the ruler bends naturally over the wide sides. It would twist in your hand ‘trying’ to bend over a wide side when casting or when fighting a big fish if the guides were mounted on a narrow side. Why does it bend naturally over the wide sides? Because it is has less material to prevent bending and is less stiff in that plane.
So from the ruler example we can derive the principle that, in order to prevent twisting, we should “orientate the guides in line with the less stiff plane”.
The same principle can be applied to a round section rod with unequal stiffness planes. Orientate the guides in line with the less stiff plane. Which is the less stiff plane? One that is perpendicluar to the stiff plane NOT in line with it – think again of the ruler.
Some of the confusion comes, I think, from the use of the term ‘spine’ or ‘spline’ . To me the word ‘spine’ suggests ‘backbone’ and therefore indicates ‘strength’ and ‘stiffness’ . For me, the ‘spine’ is therefore in the stiffer plane (it in fact causes the stiffer plane). A graphite rod has unequal stiffness planes, and a ‘spine’, because the cloth out of which the rod is made has to overlap itself. The wall thickness is thicker along the overlap and this makes the rod relatively stiffer in that plane. The overlap is the spine. See this illustration

When, as Wayne Cattanach suggests, one supports a hex bamboo rod section in one hand and rolls the ferruled end on a surface to establish the point at which it ‘kicks’, the kick occurs as the rod moves off the stiff plane (spine) onto the next flat which has a less stiff plane. The guides technically should therefore be placed on the flat on which the rod ‘lands’, not the one that it kicked off (the spine). I say ‘technically’ because in reality, with a well made bamboo rod, I don’t believe the spine is pronounced enough to induce twisting, which is after all what we are primarily trying to avoid.
As a further explanation consider these questions:
1) Do you agree that if you put the guides on the narrow flat of a rectangular rod, the rod will want to twist when you fight a big fish or cast a long line?
2) In which of the following 2 scenarios would you say the spine/spline is more likely to be directly on top of, or directly underneath, the rod ( i.e. facing the ceiling or facing the floor) ?
Scenario A – You clamp the grip of a rod blank on a table with the end cantilevering out. You hang a weight on the tip and the rod deflects, say, 1 foot.
Scenario B – You rotate the rod through 90 degrees and re-clamp it to the table with the end cantilevering out the same amount. You hang the same weight on the tip and the rod now deflects, say, 2 feet.
3) In which of the scenarios in question 2 would you recommend placing the guides facing the ceiling or floor?
Answers:
1) I think you have to agree. If you don’t, try this experiment. Place a cuphook in the narrow side of a long thin rectangular section of timber at one end. Clamp the other end of the timber to a table with the cup hook end cantilevering well off the table. Hang a heavy weight from the cuphook and see what happens. Roll the section through 90 degrees, reclamp, re hang the weight and see what happens. I guarantee the timber will try to bend over the wider flat in both instances and will twist to do so if necesary.
2) If you answer ‘A” then we are in agreement about what the term ‘spine’ or ‘spline’ refers to and which plane it located in the stiff plane. if you answer ‘B’ we have different meanings for the word ‘spine’ and we may well still agree on where the guides should be placed in principle
3) If you agree with question 1 and answered ‘A’ to question 2 then you have to answer ‘B’ to question 3 – because the rod in the scenario could be a rectangular one – and we are then in agreement that the guides should NOT be orientated in line with the ‘spine’ or ‘spline’
That’s the way I see it. I may very well be wrong. After all , the rods I build tend to have negligible spines, if any, and that may be why I have not had an issue with twisting. Whilst I believe my reasoning is sound I would welcome a convincing argument or explanation to the contrary.
